- Industrial Power Supply[9]
- Other Power Supplies[3]
- Other Welding & Soldering Supplies[1]
- Electric Soldering Irons[10]
- Other Welding Equipment[10]
- Other Analysis Instruments[2]
- Frequency Meters[3]
- Power Meters[3]
- Oscilloscopes[10]
- Other Electronic Measuring Instruments[10]
- Signal Generators[1]
- Spectrum Analyzers[10]
- Other Measuring & Analysing Instruments[10]
- Testing Equipment[4]
- Other Tools[1]
- Contact Person : Ms. Ho Tina
- Company Name : Nanjing Glarun-Atten Technology Co.,Ltd
- Tel : 086-755-86021384
- Fax : 086-755-86021347
- Address : Guangdong,Shenzhen,Building A29,Tanglang Industrial Zone,Xili,Nanshan Shenzhen 518055,P.R.China
- Country/Region : China
- Zip : 518055
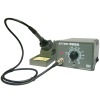
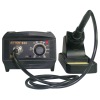
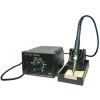
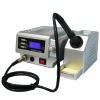
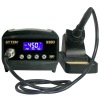
LCD 80W soldering station


Related Product Searches:LCD 80W soldering station,High Quality,air soldering station, soldering desoldering station,AT980D
AT980D Features
ESD safe – suitable for work on static-sensitive components
Three programmable preset temperature buttons
Easy to read white-on-blue LCD with temperature in °C or °F
Temperature range: 150°C~450°C (302°F~842°F)
On/Off switch on side of unit
Includes soldering iron, stand, and sponge
Additional range of soldering tips available
Technical Specifications
Input Voltage: AC 220V(110V optional)
Input Frequency: 50/60Hz
Power Consumption: 80W (max)
Temperature Range: 150~450°C
Tip and ground impedance: <2 Ohm
Tip and ground potential: <5mV
Heating Element:4 cores,80W
Standard tip: AT-900M
Parts List
Soldering Iron | 1PC |
Iron holder | 1SET |
Power Cord | 1PC |
Manual | 1Copy |
Clean sponge | 1PC |
Operating Guidelines
1.Connection: Insert soldering iron's plug into the socket and tighten the nut on the plug securely and place it in iron holder.
Inset station's power cord into power plug on the back panel and plug the cord into a power source.
2.Turn on the unit.The Digital display will initially display the current set temperature (the value of last time using for 3 seconds. After few seconds it would display the actual temperature with temp unit “°C or °F”. (diagram 1), (diagram 2)
3.Adjusting Temperature:Under normal working condition, pressing and holding button you can either increase or decrease the temperature quickly. Keeping the knob in pressed will adjust the temperature setting quickly; short pressing knob, you can adjust temp step by step. The display screen shows the temperature value simultaneously. Release knob for 3s to store. (Diagram 3)
4. Quickly adjusting temperature: Under working condition, you can set working temperature quickly by programmable buttons. Press the button once to extract setting temperature stored in button “1, 2 & 3”, this way you can easily set the working temperature.
Pressing button “#” and buttons “1, 2, 3”, you can store the setting temperature into fast channel knobs “1, 2, 3”.
Temperature hotke:
A. Hotkey 1 is usually applied to store a 200ºC or lower temperature value at which level machine stands by and on rest.
B.Hotkey 2 is a shortcut of temperature between 300ºC to 350ºC at which level a general soldering job can be done.
C.Hotkey 3 is a fast channel to high temperature of 380ºC specificied for special welding job.
5.You need calibrate the temperature of tip after you replace with a new heating element or tip. Enter into calibrating station by long pressing knob “ ” (>3s).You can directly adjust the value of calibration by pressing knob .The value of calibration is temperature measured minus the settings. (e.g. Actual value 380ºC- setting value 350 ºC = +30 ºC. Pressing knob adds 30 ºC; Actual value 320 ºC -settingvalue 350 ºC=-30 ºC. Pressing knob minus 30 ºC). The calibrating temp range is +50 ºC ~ -50 ºC. You can press knob“ ” to store after you finish calibration. (diagram 4)
6. In the power off condition, press and hold knob “#”, then turn on the station, the temp unit will be changed between “ºC” and “°F” and store automatically.
7. Temperature LockDisplay: “Loc”, short of Lock, located in right bottom of LCD display screen.
Temperature lock&unlock function can be realized by pressing “#” for three second or longer.
Whenever the machine is locked as above photo shows, the functional key in panel lose effect.
8. False alarm:When “H-E” or “S-E” is displayed on the screen, there is some wrong in heating element or the circuit. ( diagram 5, 6). Turn off the unit and follow the instructions to replace the heating element.
Warning
Temperature of iron tip will be up to 200 – 400 ºC after connecting power, so it may lead to injury
or fire because of improper usage. Please abide the following terms:
Don't touch the iron tip or surrounding metals.
Never operate it near the flammable gas or substance.
Disconnect from power source if the unit will not be used for long periods. Switch off power during short breaks.
Replace accessories or iron tip after turning off the station and let it cool down.
Never operate this device, if you don't have soldering experience or enough knowledge to use.
Keep away from children.
Care and Maintenance
Keep the soldering station dry; if it gets wet, dry it immediately.
Use the soldering station only in normal temperature environments.
Keep the soldering station away from dust and dirt.
The soldering iron tip should be cleaned after use by wiping it on the damp sponge found in the soldering iron stand. This is to get rid of burnt solder or fluxes that cause oxidation on the tip.
Changing Soldering Tip
Always turn the power OFF when removing or inserting a tip
Let the tip to cool down to room temperature before holding it with heat resistant pads
Unscrew the metal cap nut
Pull out the shaft of the soldering iron
Replace it with a new soldering tip.
Put back the shaft and securely lock with the metal cap nut
LCD 80W soldering station